

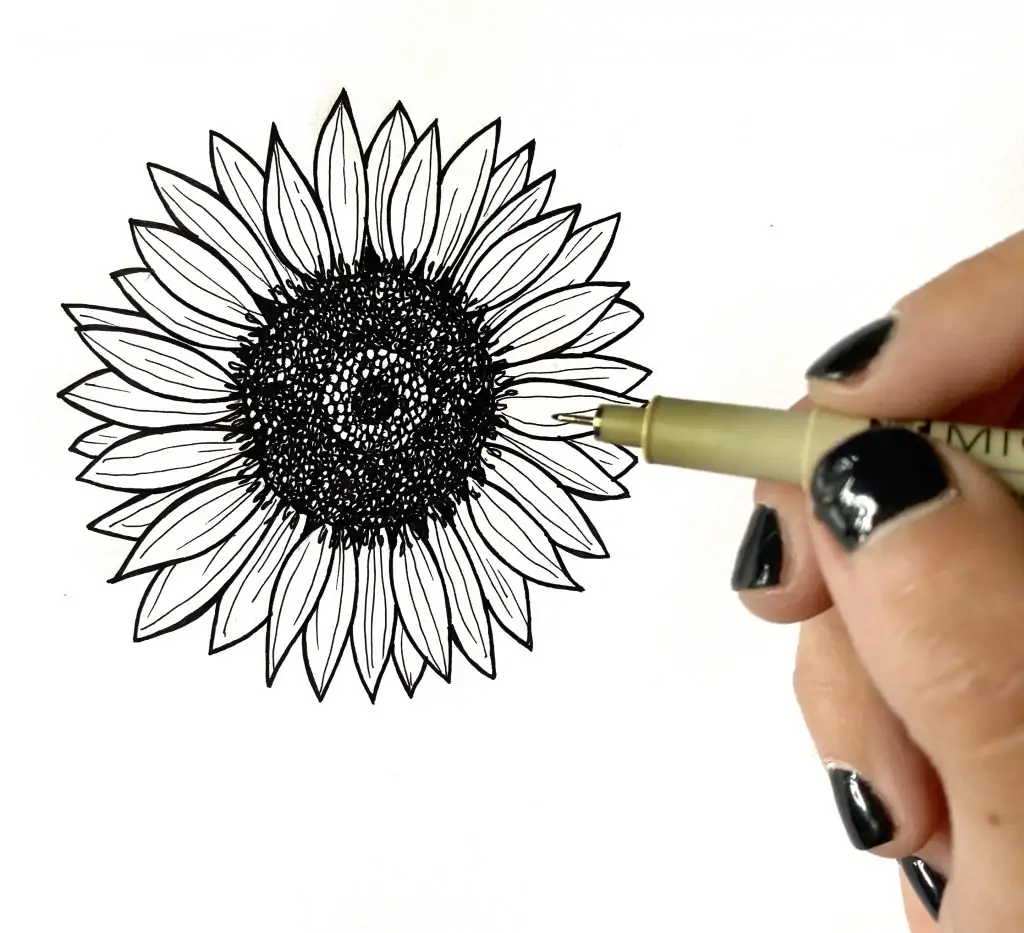
How To Draw A Flower How To Draw A Sunflower
Wanna know how to draw a sunflower pace-past-step?
What a coincidence.
It but so happens that I made you a stride-by-step tutorial on how to draw a sunflower! Information technology even includes costless traceable worksheets!
Yep, free worksheets! Y'all tin download those at the end of this mail service.
First Things Outset…
The links below may be chapter links where appropriate. This means that your purchase through these links may result in a few cents in payment to me, to support creating further resources like this one! That being said, I will never propose supplies that I practise not personally use and fully recommend.
Supplies Mentioned
- Micron Pens (sizes 01, 03, 05) – Yous don't take to accept multiple sizes. I pen is totally fine if that'southward what yous have available.
- Rhodia Paper
- Pencil
- Eraser
Rather lookout than read? No problem! Yous can sentinel me depict a sunflower in real-time by clicking the video beneath!
Let'southward Get Started!
Thankfully you don't need super fancy supplies for this one. Grab a pencil and some blank paper (I used Rhodia).
Start by drawing a small circumvolve so a slightly bigger circle around information technology.

From there, you're going to add one more than circle. (I hope this will make sense and isn't a muddied cartoon – this is a flower, think?!)

Finally, y'all'll add a fourth and last circle. Nada in nature is perfect, so don't worry also much almost perfecting size or spacing. This isn't meant to exist perfect. And flowers are meant to be a scrap imperfect.

Side by side, grab your Micron 01. Think, if you simply have one pen, that's totally fine.
Draw some jagged edges around your first three circles (non the 4th and biggest circle). These don't accept to be perfect – they are just to add some dimension.


Calculation Petals
Then grab your Micron 03 and commencement drawing petals. People start to freak out a bit at this part, but try not to let it worry you lot too much when y'all get to this step. Again, nature isn't perfect. Flowers aren't perfect.

You lot will draw those petals from the outside of your third circle and extend them out to around where your quaternary circle is. These don't need to be the same distance apart, the verbal aforementioned shape, etc. Perfection would never happen in real life, and you want your drawing to exist realistic.

Draw your petals all the way around your circumvolve, unevenly spaces, varying shapes.
Adding Fractional Petals
And so draw in your fractional petals. Yous want to fill in the rest of your circumvolve with these. Make sure you get both the tips on the outer edge also as the parts on the within of your circle. You need to encounter all the parts of the petals to make the petals look finished.


Make full in whatever gaps – ultimately yous're simply filling in this bigger circumvolve with petals.

Calculation Some Details
And so switch back to your Micron 01 (if yous're using multiple sizes).
This part is super irksome. Start in the centre (your smallest circle) and brand a bunch of little circles. Your goal here is to fill in the center of the circumvolve with petty tiny circles that are tightly packed. They don't have to be perfect at all. They can overlap. They tin touch or overlap your original jagged line/circumvolve. They can vary a bit in exact size and shape. No perfection needed.


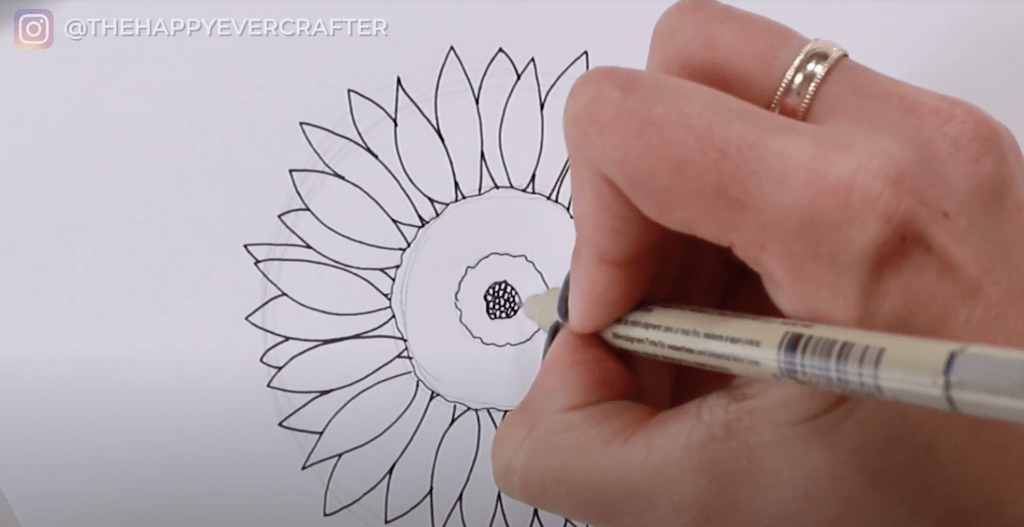
You're going to exercise the aforementioned matter on your next section, just you'll make these circles a little bit bigger. Nevertheless imperfect. Nevertheless filling in all that infinite. Merely a little bigger and not as tightly packed this fourth dimension.


Then switch dorsum to your Micron 03. You're going to make tiny circles again in your last bigger department. You desire to do tiny, tightly packed circles again for this 1 (like in the heart of your circle) – you're just using a bigger pen this time. You want this to expect like the most tightly packed section. The bigger pen will get your lines nice and nighttime, which volition help your tiny circles wait more than tightly packed.


This might accept a while. Put on some nice music, zone out a flake, and fill in your circle. Your wrist might injure – take a intermission if you need to! 🙂
As you finish this last section, y'all'll outset to run across how each section is differentiated a bit based on how you filled them in.
Adding Some Contrast
Recollect those jagged lines you drew to separate your circle sections? Y'all're going to become over those again with your Micron 05 – substantially you are going to add in some more jagged lines around each circle to add some contrast.


So, go over your center section once more with the bigger pen.You desire to add together some more circles in in that location to brand it even darker.


Next, add in your thicker jagged line on your outermost rim. Adding contrast!

And then, in that outermost department, you want to fill up in some of the space between tiny circles with your thicker pen. Instead of actually filling in allllll those spaces, just describe scribbled lines throughout. Just a lot of scribbled lines throughout the entire section. Don't worry about overlapping your tiny circles – just scribble.


This volition add more than and more contrast.
If you're wondering what exact shapes to brand hither for scribbles, here'southward an idea of what I did:
Information technology looks actually messy, but one time y'all're putting it inside your section with all the tiny circles, it looks pretty good.


Exist certain you fill out the unabridged outer department.


So you're going to exercise the exact same thing with your middle, lighter department also. Same jagged lines but a little less dense – yous don't want this section to be every bit tightly packed, call back?


Adding Some Spikes
Back to your Micron 03. You lot're going to add some spikes to the outer edge of your blossom. This gives your flower even more dimension.


If you want to know what that looks like, hither's an idea of what I did:

Just little shapes, super imperfect. This adds some more shape, more dimension, and more texture to your bloom. Make sure you lot go all the way around your circumvolve.

Adding Some More Details
Time for the Micron 01 once again. You're going to add some shading and dimension on the actual petals themselves now.
Starting at the middle, bring upwardly some super imperfect lines up from the eye of your petals. These tin can go all the way to the tip, they can stop part of the way, etc. These are meant to exist light, imperfect lines. The only "rule" here is to make certain they are always directional to the middle of the flower. You don't want lines coming sideways out of the petals.


Piece of work your way around your flower until all of your petals take some of these dimension lines.


This part is and then fun! You can finally see the flower really coming together at present!
Adding Some Popular
Technically you lot could finish here if y'all wanted to (it looks pretty prissy already). But I recommend adding a scrap more dissimilarity. This is what I find makes the blossom really pop.
Go back to your Micron 05 for this step. Fill in some of the gaps and overlapping spots at the center of your flower (where the petals overlap a bit). This gives some depth to the petals and makes them pop effectually the border.


Next, become over all of your petals with your Micron 05. Exist conscientious when you're doing this, and go boring if you need to. You lot still want to go on the same general shape of your petals, but add some dimension to the edges with your thicker pen. It actually makes your petals stand out from the rest of the flower and gives the edges a bit of popular.


Calculation Some Final Touches
Last just non least, erase! Y'all shouldn't need to erase the centre at all (this step is mostly for the petals and the circumvolve you fabricated for them). Merely feel free to erase the entire thing just in case.

And that'southward a wrap!
There you have it! A cute sunflower! Those circles might be the bane of your existence, but I hope you lot love the final product!

If y'all enjoyed this, experience free to check out all my other floral tutorials here. 🙂
Download your Free floral doodles workbook here!

And finally, your dad joke…
The sunflower couldn't ride a bicycle anymore.
Its petals broke.

Source: https://www.thehappyevercrafter.com/blog/how-to-draw-sunflowers/
Posted by: roybaltagning.blogspot.com
0 Response to "How To Draw A Flower How To Draw A Sunflower"
Post a Comment